The title should be "Testing maximum number of authors for a Blogger beta blog" but Blogger has declared that Bloggeer Beta is now out of beta, so, no beta in the post title.
Someone emailed me, asking if it is really true that you can have an unlimited number of authors for a Blogger (beta) blog. I don't know if I had said that in any of my blogs, but to answer his question, I decided to do a little test. I got into the Dashboard of this blog Good Parenting Practices (close new window/tab to get back to this page) and clicked the SETTINGS > PERMISSION tabs. I started to add email addresses to invite to become authors of the blog. I got up to 23 addresses and there still was no message that I have reached the limit. So I still don't know the maximum number of authors one can have for a Blogger blog, but definately it is 23 or more. I have asked the person who emailed me to let me know how many authors he added, and I hope he gets back to me. If he does, I will put an update.
BTW if you are a parent, and you have advice or good information to share, and will like to contribute to this blog, please contact me via that eMail Me link (at the bottom of the sidebar) and I will send you an invitation, and I will have a chance to further test the limit of Blogger.
UPDATE 24 December 2006: Turned out that there actually isn't a limit on the no. of authors allowed for a team blog. See Blogger Limits (close new window to return to this page). Looks like my testing wasn't necessary if only I had tried to look hard enough for the answer.
Friday, December 22, 2006
Sunday, December 17, 2006
Photo of traditional kite flying in Kelantan, Malaysia

Reason for uploading this photo via Blogger photo upload icon, Phydeaux3 reported when uploading photos via Blogger, Beta IP and Image Hosting Changes (close new window/tab to get back to this page). I just wanted to test if it is so.
Another reason - doing my bit for my country. 2007 is Visit Malaysia Year and hoping to promote tourism to Malaysia via this photo of a Malay dressed in traditional garb flying a traditional kite in the East Coast of Peninsular Malaysia. The photo is copyrighted by Tourism Malaysia, but is free to use to promote Malaysia. Lots of programs are being and have been planned for the enjoyment of visitors. You can view the programs and also other aspects of Malaysia at Guide to Malaysia (close new window/tab to get back to this page).
Traditionally, photos uploaded via Blogger are hosted at
http://photos1.blogger.com/....
Sure enough, as reported by Phydeaux3, the photo above is now hosted at
http://4.bp.blogspot.com/.....
If you want the actual URL of the above photo, click on it and you can get the URL from the address bar in the resulting webpage or hover your mouse over the photo and observe the URL in the taskbar or in a "pop-up", depending on your browser.
Update 28 February 2007: Previously, the photo stay on the web even if you delete the post or the photo. Now, when you delete the photo or the post, the photo is deleted from the web. This may be good news for those who post a lot of photos and are worried about exceeding the 300MB limit. Another change in New Blogger. Previously, if you delete the photo or the post containing the photo, the photo remains on the web. Now, if you delete either, your photo is also deleted from the web. See post Uploading photos and deleting posts in New Blogger (formerly Blogger Beta).
Friday, December 08, 2006
Testing Haloscan comment hack for Blogger Beta
Many people using the Haloscan comment system have complained that it does not work for Blogger Beta blogs. amrlion (close new window/tab to get back to this page) mentioned that there is a hack for that and gave this link Getting Haloscan to work in Blogger beta. (close new window to get back to this blog).
I tested the hack for this blog Good Health Articles (close new window to get back to this page).
I followed the instruction in that post, which is, first, to find this block of codes in the template with the widget expanded:
<span class='post-comment-link' >
<b:if cond='data:blog.pageType != "item" '>
<b:if cond='data:post.allowComments'>
which I found somewhere in the middle of the template (use EDIT > FIND from the menu bar).
The next instruction is to do this:
"DELETE the code that is in between the code above and the "<'/b:if'>" that comes next. If you don't do this you'll see both the blogger comments AND the haloscan comments come up."
that is, to delete the codes from <b:if cond='data:post.allowComments'> to the next <'/b:if'> and insert the following codes, (the XXXX being your haloscan user name):
I am using Ramani's 3 column template and what I found was this:
That is, instead of just one "<'/b:if'>" I found "</b:if>", and there were more than 1 "</b:if>". I deleted the portion up to the second "</b:if>" and replaced it with the above codes with the XXXX replaced with my Haloscan username.
That is, I deleted :
and replaced it with the given codes above, and thus ended up with this:
There were a few updates, one of which I was required to look for the following:
< id="'comments'" var="'post'">
< id="'comments'">
< name="'comments'/">
< 'h4' >
I couldn't find it, and I didn't proceed with the instructions in the updates. However, what I found is that the hack worked for the main (index) page and the archive pages, but in the individual post pages (permalinks), the blog was still stuck with the Blogger comment system. Perhaps it was because I was using Ramani's 3 column template rather than the standard Blogger beta template. If you really want the Haloscan comment system to work for the individual post pages, you can try to proceed further than what I have done for this blog Good Health Articles
Update 9 December 2007: With a little hint from Logical Philosopher or amrlion (close new window/tab to get back to this page) and a little experimenting, got the HaloScan comment system into the individual post page. But the system exist together with the Blogger comment system. Got an email from Ron of Rodentia (close new window/tab to get back to this page) suggesting going to SETTINGS > COMMENTS and set "Comments" to "hide" which I did. I checked the individual post page, and sure enough, I get only Haloscan comment there, no Blogger comment. I checked the main page. None of the posts there had any COMMENT, neither Blogger comment or Haloscan comment. So that ended my little bit of experimenting. I reset the COMMENTS to show and I am back in business again with only Haloscan comment in the main page and the archive pages, and the Haloscan comment coexisting with the Blogger comment in the individual post page. I am going to see if I can get any suggestion from amrlion on how to get rid of the Blogger comment in the individual post page. If I do, and it succeeded, you will see an update here.
I tested the hack for this blog Good Health Articles (close new window to get back to this page).
I followed the instruction in that post, which is, first, to find this block of codes in the template with the widget expanded:
<span class='post-comment-link' >
<b:if cond='data:blog.pageType != "item" '>
<b:if cond='data:post.allowComments'>
which I found somewhere in the middle of the template (use EDIT > FIND from the menu bar).
The next instruction is to do this:
"DELETE the code that is in between the code above and the "<'/b:if'>" that comes next. If you don't do this you'll see both the blogger comments AND the haloscan comments come up."
that is, to delete the codes from <b:if cond='data:post.allowComments'> to the next <'/b:if'> and insert the following codes, (the XXXX being your haloscan user name):
<script src='http://www.haloscan.com/load/XXXX' type='text/javascript'> </script>
<a expr:href='"javascript:HaloScan(" + "\"" + data:post.id + "\"" + ");"' target='_self'>
<script type='text/javascript'>postCount('<data:post.id/>');</script>
</a>
<a expr:href='"javascript:HaloScan(" + "\"" + data:post.id + "\"" + ");"' target='_self'>
<script type='text/javascript'>postCount('<data:post.id/>');</script>
</a>
I am using Ramani's 3 column template and what I found was this:
<span class='post-comment-link'>
<b:if cond='data:blog.pageType != "item"'>
<b:if cond='data:post.allowComments'>
<a class='comment-link' expr:href='data:post.addCommentUrl' expr:onclick='data:post.addCommentOnclick'><b:if cond='data:post.numComments == 1'>1 <data:top.commentLabel/><b:else/><data:post.numComments/> <data:top.commentLabelPlural/></b:if></a>
</b:if>
</b:if>
</span>
That is, instead of just one "<'/b:if'>" I found "</b:if>", and there were more than 1 "</b:if>". I deleted the portion up to the second "</b:if>" and replaced it with the above codes with the XXXX replaced with my Haloscan username.
That is, I deleted :
<a class='comment-link' expr:href='data:post.addCommentUrl' expr:onclick='data:post.addCommentOnclick'><b:if cond='data:post.numComments == 1'>1 <data:top.commentLabel/><b:else/><data:post.numComments/> <data:top.commentLabelPlural/></b:if></a>
and replaced it with the given codes above, and thus ended up with this:
<span class='post-comment-link'>
<b:if cond='data:blog.pageType != "item"'>
<b:if cond='data:post.allowComments'>
<script src='http://www.haloscan.com/load/blogsmith' type='text/javascript'> </script>
<a expr:href='"javascript:HaloScan(" + "\"" + data:post.id + "\"" + ");"' target='_self'>
<script type='text/javascript'>postCount('<data:post.id/>');</script>
</a>
</b:if>
There were a few updates, one of which I was required to look for the following:
< id="'comments'" var="'post'">
< id="'comments'">
< name="'comments'/">
< 'h4' >
I couldn't find it, and I didn't proceed with the instructions in the updates. However, what I found is that the hack worked for the main (index) page and the archive pages, but in the individual post pages (permalinks), the blog was still stuck with the Blogger comment system. Perhaps it was because I was using Ramani's 3 column template rather than the standard Blogger beta template. If you really want the Haloscan comment system to work for the individual post pages, you can try to proceed further than what I have done for this blog Good Health Articles
Update 9 December 2007: With a little hint from Logical Philosopher or amrlion (close new window/tab to get back to this page) and a little experimenting, got the HaloScan comment system into the individual post page. But the system exist together with the Blogger comment system. Got an email from Ron of Rodentia (close new window/tab to get back to this page) suggesting going to SETTINGS > COMMENTS and set "Comments" to "hide" which I did. I checked the individual post page, and sure enough, I get only Haloscan comment there, no Blogger comment. I checked the main page. None of the posts there had any COMMENT, neither Blogger comment or Haloscan comment. So that ended my little bit of experimenting. I reset the COMMENTS to show and I am back in business again with only Haloscan comment in the main page and the archive pages, and the Haloscan comment coexisting with the Blogger comment in the individual post page. I am going to see if I can get any suggestion from amrlion on how to get rid of the Blogger comment in the individual post page. If I do, and it succeeded, you will see an update here.
Thursday, December 07, 2006
Testing uploading of a large photo to Blogger Beta blog
Someone said that when he uploaded a photo to a Blogger beta blog via Blogger photo upload icon, it was not resized, but came out huge. This is a suprise to me, so to see if it is really so, I am going to upload a really huge photo (3.30 MB or 2487 x2528 pixels) and see what happens (I chose CENTER and LARGE for the upload):

Petronas Twin Tower
Well, it turns out OK. It took me 5 minutes to upload. I viewed it with Opera, but just to make sure it doesn't cause any problem in Internet Explorer, I also viewed the post in IE (large screen) and it also turned out OK. The sidebars are where they should be. I also resized the screen to 800x600 resolution by pasting javascript:top.resizeTo(800,600) into the address bar, and it still was OK.
BTW, the image is the Petronas Twin Towers, what used to be the tallest building in the world, and is copyrighted by Tourism Malaysia. It can be used for promoting Malaysia. I am also helping to promote Malaysia by posting the image here and also giving a link to my other blog Guide to Malaysia (click "BACK" button to get back to this page). Malaysia will be having a Visit Malaysia Year 2007 and we hope to see you there.
Sunday, November 26, 2006
Testing blog post and comment notification via email using Google grooup
There have been question about how to get post and/or comment via email. For email notification for new post to blog owner, this can be done via the template, but this will apply only to the blog owner, not other team members. The method outlined in this post will be useful for team blogs with many team members. I have written a post on that using Yahoo group with which I am very familiar. The post is here: How to get comment and post notification via email (close new window to get back to this page). I am not so familiar with Google group, and since I haven't tested such method with a beta blog, I thought this will be a good time to test it. I have set up a beta blog Good Health Information for the purpose of testing and also for the purpose of publishing articles on health. I have also set up the Google group http://groups.google.com/ghis (ghis is short for Group Health Information Subscription). The reason for the 4 alphabets will be given later. The way to post to the group is thus to send an email to ghis@googlegroups.com. I have then gone into the Dashboard of the Good Health Information blog, click on the SETTINGS > EMAIL tabs and and set the BlogSend address as ghis@googlegroups.com

(Blogger wouldn't accept email address with only 3 alphabets like ghi, also email address with too many alphabets. That is the reason for setting up the Google group as above, and not with a long name). I have similarly click on the SETTINGS > COMMENTS tabs and set the "Comment notification address to ghis@googlegroups.com:

Now, whenever anyone publish a post to that group or comment on a post, that will be posted on the Google ghis group, and anyone joining that group and have elected to receive posts by email will get a notification whenever a post or comment is made to the Good Health Information group.
I have tested it and it works OK, after correcting some mistakes.
Try it. Join the Google ghis group (close new window to get back to this page), elect to receive post by email, then make a comment on the Good Health Information (close new window to get back to this page) blog, and check your email. The comment should be in your Inbox.
Sunday, November 19, 2006
Testing "Blog this" from Picasa to Blogger Beta
The Google photo software - Picasa has a "Blog this" via which you can post photos direct to your Blogger blog. The problem before was, you can only do this for Blogger classic template. It has been announced that now it is possible to use "Blog this" function for Blogger beta blogs.
I decided to test this, and at the same time, write a post for my other beta blog Guide to Malaysia (close new window to get back to this page). I downloaded and installed the software from a referral button on a friend's site as I am not allowed to do it from my own site. And after installation, I had immediate access to the photos in my computer. I chosed one, click on the "Blog this" button in the toolbar at the bottom of the page (see screenshot below):

A page opened, allowing me to log into either my Blogger classic account or Blogger beta account. I click on "Sing in to Blogger in beta" and was taken to a page to sign in. After that, was a page to select the blog from a drop-down menu, and a choice of small, medium, large, none, left, right and center. After the selection, a post editor window opened with the photo HTML already in place, and I just type in the rest of my post. The result is this: Multi-racial, multi-cultural Malaysia, truly Asia (close new window to get back to this page). By the way, that beautiful Malaysian Chinese lady is my daughter.
So, it is confirmed. You can use "Blog this" with Picasa for Blogger Beta. You read about Picasa and also download and install Picasa from My Photo Store
Saturday, November 18, 2006
Testing "Blog This" for Blogger Beta.
A reader of my blogs asked about the "Blog This" feature for Blogger Beta, and I replied that the truth is, I have never ever used that feature before, but I am a retired scientist, and scientist like to experiment. So I have just installed the "Blog This" link  to my FireFox Link bar and found a newspaper article I would like to blog about while I was logged into the Blogger beta account. I highlighted some text, and clicked the "Blog this" link, and a pop-up opened, requiring me to sign in. I filled in my gmail address and the password (same as the one I was already logged into) and submitted it, but got the error message "User account not found". Looks like you guys who are dying to use the "Blog this" feature for Blogger Beta will just have to be patient and wait.
 to my FireFox Link bar and found a newspaper article I would like to blog about while I was logged into the Blogger beta account. I highlighted some text, and clicked the "Blog this" link, and a pop-up opened, requiring me to sign in. I filled in my gmail address and the password (same as the one I was already logged into) and submitted it, but got the error message "User account not found". Looks like you guys who are dying to use the "Blog this" feature for Blogger Beta will just have to be patient and wait.
Friday, November 10, 2006
Post URL (permalink) remains the same even after changing the title and date
Changing the title of the post after the post is published does not change the Permalink
I posted a photo of Malay traditional kite flying in this post: Traditional kite flying in Kelantan, Malaysia (click "BACK" button to get back to this post) for reasons you can find in that post. That was the original title of the post and its individual post URL (permalink) washttp://testing-blogger-beta.blogspot.com/2006/12/traditional-
kite-flying-in-kelantan.html.
I then had second thought and think the title is not very appropriate for this blog, and decided to change its title to Photo of traditional kite flying in Kelantan, Malaysia, and had expected the individual post page (permalink) to change, as in Blogger classic to something like this:
http://testing-blogger-beta.blogspot.com/2006/12/photo-
traditional-kite-flying-in-kelantan.html.
This would have been a bad thing as existing inbound links may then become dead link, and that post will have to start afresh with search engines. I had a pleasant suprise. Although the title was changed, its URL remained the same, which to me, is a good thing. (you can confirm that by looking at the URL in the address bar in that post or hovering your mouse over the timestamp at the bottom of the post and observing the taskbar or "pop-up" depending on the browser).
Testing to see if changing the date of a published post change the permalink
From this pleasant suprised find, I decided to do another test. Previously, with Blogger classic, if you change the date and/or the post title, the individual post page URL (permalink) will also change (not a good thing). I am posting this at 2:58am, 12/19/06 and will be changing the date the next few days, and again next month (January 2007), to see if this will change the permalink. My expectation is that if I change the date to the another day in the same month, the URL will probably remain the same as it seem to depend on the month (12). When I change the date next month, the individual post page (permalink) will probably change, but in Blogger beta, I hope not. Anyway, we will see in the next few days, and next month.
For the record, after publishing this post, I see that the individual post URL (permalink) is
http://testing-blogger-beta.blogspot.com/2006/12/post-url-
permalink-remains-same-even.html
UPDATE 25 December 2006: Editing this post, clicked on "Post Options" at bottom of post editor, and changed date to 12/25/06. Now let's see what happen to the permalink. After publishing, I found the individual post page (permalink) of this post to be
http://testing-blogger-beta.blogspot.com/2006/12/post-url-
permalink-remains-same-even.html
which is the same as the above. In other words, changing the date to a different day in the same month doesn't change the post URL. Next is to try it next month.
UPDATE 2 January 2007: I am now editing this post and have clicked the Post Options in the lower left corner of the posst editor to change the date from 12/25/06 to 1/2/07 to see if that will change the post URL (permalink) which as stated above is
http://testing-blogger-beta.blogspot.com/2006/12/post-url-
permalink-remains-same-even.html. Publishing the post now.
Well, what is the result? Although republishing the post with the date to 1/2/07, the post URL (permalink) remained
http://testing-blogger-beta.blogspot.com/2006/12/post-url-
permalink-remains-same-even.html
This is good news, as when we changed our mind regarding the post title and date, the permalink remain the same, and we can do so without worrying about dead links in search engine result pages and other inbound links. I am going to change the title from "Post URL (permalink) remains the same even after changing the title" to "Post URL (permalink) remains the same even after changing the title and date" to reflect this additional test and can be assured that it will not affect the permalink.
UPDATE: 8 January 2007: Still more test. A reader of my blogs commented at my post How to change the order of the posts. This is his comment: "Thanks Peter, that is the method I am using. The issue is that the post editor seems to ignore any date change I make there. It accepts a new date and time on a post but when 'published' the time and date changes are ignored by blogger." He is referring to the new Blogger (formerly beta) and if I understand him correctly, he is saying that if he edit a post today, but using the POST OPTIONS to change the date, say to November 2006, which will mean that this post will still remain at the top of the main page as new Blogger will ignore the change in the date. That is not what I experience, and if I am correct, and change the date of this post to 11/11/06, this post will no longer be the second post in the main page today, the date at the top will change to 11 November 2006 and the post will end up in the archive and no longer visible in the main page, even though the permalink (individual post page URL) remain the same. I am going to do it now and see what happens.
RESULT: As I expected, this post disappeared from the main page, and ended up in the archives for 2006.
Testing effect of saving a post as draft and publishing it later with a different title
I wanted to test something. A member at Google Blogger Help group commented that he discovered that when he save a draft with a title, and then published it with a different title, the URL for the individual post page (permalink) follows the original title of the draft. I prepared a post to be saved as draft with the title "Bullshit", but mistakenly posted it instead. See post Bullshit (click "BACK" button to get back to this post.
Instead of resaving it as draft to be published later with a new title, I decided to leave that post alone, and prepare a new post, save this post as draft with an original title "All bullshit", now publishing it later with a new title "Testing effect of saving a post as draft and publishing it later with a different title on the URL". This post actually prepared on 10 November 2006, saved as draft, and now being published. Here goes:-
Well, the new title was incorporated into the post URL:
http://testing-blogger-beta.blogspot.com/2006/11/testing-effect-
of-saving-post-as-draft.html
This shows that what the member of the problem said is not correct. There URL follows the new Title.
Bullshit
A member at Google Blogger Help group commented that he discovered that when he save a draft with a title, and then published it with a different title, the URL for the individual post page (permalink) follows the original title of the draft. This, if true, will not be good for search engine purposes as the text in the URL is important when people are searching for relevant sites. So I am going to test this to see if what he said is true. I am going to put the title as bullshit and then saving it today 11 November 2006 as a draft, and then publishing it later, with a different title "Testing saving a post as a draft, and then publishing the post later with a different title".
NOTE: I mistakenly published the post instead and have already ping the various services at pinggoat.com. So, I am going to copy the content into a new post and save it as draft with the title "All bullshit" and later republishing it as "Testing saving a post as a draft, and then publishing the post later with a different title".
This post will remain temporarily on the Web, but will be deleted later.
BTW, the URL of the individual post page (permalink) is http://testing-blogger-beta.blogspot.com/2006/11/bullshit.html. Note that the title Bullshit was incorporated into the URL.
Wednesday, October 25, 2006
Testing uploading of profile photo in Blogger Beta
Latest Update: Further down the post would be a description of my testing the limit for the character count for the URL of Blogger Beta profile photo. It must be 256 or less compared with 68 characters for Blogger classic. Just wanted you to have the information without having to read till the bottom of the post.
The method of uploading a photo to the profile is the same in Blogger classic as well as Blogger beta. One click EDIT PROFILE in the Dashboard and then enter the URL of the photo into the field for Photo URL. Blogger classic impose a limit of maximum 68-character for the URL of the profile. I want to test if there had been any changes in Blogger Beta. I have thus used a photo already uploaded via Blogger. The URL for that photo is
The image is actually a screenshot in one of my posts. There are 85 characters in the URL. I have tried to put this in the profile of a classic blog, and have confirmed that it is not accepted. Error message is "URL exceeds the 68-character maximum length."
I then entered the same URL into the field for the Photo URL in this (Blogger beta) blog, and the profile saved without any problem and I have confirmed the photo can be viewed in one of my beta blog. I will be removing it as I don't plan to put a profile photo for my beta blog. So, for posterity, I put a screenshot of the profile below: .
.
I have tried to find some information for the limit for the profile photo URL in the Help files but failed. So I don't know if URL exceeding 85 characters will be accepted. If I find a photo with URL exceeding 85 characters, I will try again.
There are various methods of hosting photos for blog profile. One is hosting it with a third party photo host like photobucket. Another is uploading the photo into a blogger post and getting the URL from there. See post How to get Blogger to host your photo for the profile, etc. (close new window to get back to this page). I prefer to host my photos with Blogger as the photos (and the blog) will as as long as Blogger stay in business, which is expected to be a very long time as it is owned by the giant Google. Further, if you use a free account in photobucket, there is a requirement that you log in at least once in 3 months, otherwise your account gets deleted, and your photo goes with it. And photobucket has to stay in business for your photos to stay. I have greater confidence in the staying power of Blogger.
However, there is a disadvantage of hosting the photo with Blogger, that is, its URL is usually long, as the example above shows. And if you are using Blogger classic, that is an impediment. Looks like with Blogger beta, that impediment has largely been removed, as Blogger beta accept photo URL with longer character length.
UPDATE: 18 November 2007: Now I have an image with 109 characters in the URL. I am going to test if putting 109 characters URL for the profile photo can be accepted by Blogger Beta (testing the limit). Result: it was accepted. Anyone has a photo with an URL greater than 109 characters?
Found one with 279 characters, now trying. Result: Not accepted. Error message: "Must be at most 256 characters". So now we know the limit for the URL of the profile photo. It cannot be more than 256 characters.
The method of uploading a photo to the profile is the same in Blogger classic as well as Blogger beta. One click EDIT PROFILE in the Dashboard and then enter the URL of the photo into the field for Photo URL. Blogger classic impose a limit of maximum 68-character for the URL of the profile. I want to test if there had been any changes in Blogger Beta. I have thus used a photo already uploaded via Blogger. The URL for that photo is
http://photos1.blogger.com/blogger2/595/342800878082638/1600/beta%20spell%20check.jpg
The image is actually a screenshot in one of my posts. There are 85 characters in the URL. I have tried to put this in the profile of a classic blog, and have confirmed that it is not accepted. Error message is "URL exceeds the 68-character maximum length."
I then entered the same URL into the field for the Photo URL in this (Blogger beta) blog, and the profile saved without any problem and I have confirmed the photo can be viewed in one of my beta blog. I will be removing it as I don't plan to put a profile photo for my beta blog. So, for posterity, I put a screenshot of the profile below:
 .
. I have tried to find some information for the limit for the profile photo URL in the Help files but failed. So I don't know if URL exceeding 85 characters will be accepted. If I find a photo with URL exceeding 85 characters, I will try again.
There are various methods of hosting photos for blog profile. One is hosting it with a third party photo host like photobucket. Another is uploading the photo into a blogger post and getting the URL from there. See post How to get Blogger to host your photo for the profile, etc. (close new window to get back to this page). I prefer to host my photos with Blogger as the photos (and the blog) will as as long as Blogger stay in business, which is expected to be a very long time as it is owned by the giant Google. Further, if you use a free account in photobucket, there is a requirement that you log in at least once in 3 months, otherwise your account gets deleted, and your photo goes with it. And photobucket has to stay in business for your photos to stay. I have greater confidence in the staying power of Blogger.
However, there is a disadvantage of hosting the photo with Blogger, that is, its URL is usually long, as the example above shows. And if you are using Blogger classic, that is an impediment. Looks like with Blogger beta, that impediment has largely been removed, as Blogger beta accept photo URL with longer character length.
UPDATE: 18 November 2007: Now I have an image with 109 characters in the URL. I am going to test if putting 109 characters URL for the profile photo can be accepted by Blogger Beta (testing the limit). Result: it was accepted. Anyone has a photo with an URL greater than 109 characters?
Found one with 279 characters, now trying. Result: Not accepted. Error message: "Must be at most 256 characters". So now we know the limit for the URL of the profile photo. It cannot be more than 256 characters.
Reporting difficulties in moderating comments in Blogger Beta
Today, I found something about moderating comments in Blogger Beta that I am not very happy about, and I hope that what is happening here is not happening in my classic blog. If you want to read more about how I came to chance upon it, you can read the thread Comment on a specific comment
I also have found that there are a long list of comments waiting to be moderated of which I am not aware because I did not get an email notification of it. I hope this is not the case for my classic blog. For those whose comments are involved, I apologise if the comments took some time to publish, or if they are not responded to, as it is going to be difficult for me to locate the post where the comments are made. This will be explained below.
From day one, I have been moderating all comments from email notifications. In the email notification, there are 3 choices:
Publish
Reject
Moderate
Practically all the time, I click Publish, and I am taken to a new window which says the comment have been publish, and there is a link to the post where the comment was made. If the comment need a response, I click on that link and is taken to the individual post page of that post where I make my response. Sometimes there are problems. The published page takes forever to open, and often, the comment has actually been published although I can't get that page that says so. If it takes too long, I either go back to my inbox, click Publish again, or I click on the link in that email notification that will take me to the post, and I check for the newly publish comment. I then respond to it.
I have never ever tried that Moderate choice. Today, I did, because someone asked if comments can be modified/edited, and I thought that Moderate choice will allow one to do that. I said I have to test by clicking on Moderate and see what happens. It so happen that the only comment that I got an email notification was this beta blog. I clicked on Moderate, and was taken to a page with a suprisingly long list of comments waiting to be moderated, and except for the one at the top, I never get any email notification of it. Anyway, I clicked on the summary to expand the message, and decided to publish it. However, to my dismay, I find that I have no means of knowing in which post that comment was made, and I am putting off moderating the rest of the comments while I do that.
UPDATE 26 October 2006: Checked my Blogger classic blog Blogger Tips and Tricks and found that there were 51 comments waiting for me to moderate dating back to July, and not only that, there was not means for me to check which posts those comments were made on. So if anyone of you had commented on that (and this) blog, forgive me if I approved your comment late and there had been no reponse because I don't have the time to go through the posts one by one to check. So this bug occur not only for beta blogs but also classic blogs. I have notified Blogger Help and am hoping they fix this quickly. I have also made a suggestion that they give the means for blog owner who moderate in the Dashboard to include information (example, a link to the post) in which that comment was made. So my advice for those who normally moderate comments from email notifications, check it from the Dashboard once in a while.
In case anyone happen not to know how to moderate comments from the Dashboard, check this post Bug in moderating comments via email in Blogger classic as well as Blogger Beta (close new window to return to this page).
Update 8 December 2007: I click "Moderate Comments" in the Dashboard of this blog today and found a comment to be moderated, and still no information as to which post the comment was posted on. I checked my mail box. There were no email notification of that comment. I have already informed Blogger Support of these "bugs" and looks like it is still not fixed.
Tuesday, October 17, 2006
Testing embeding Zoho spreadsheet into beta blogs
Testing to see if Zoho spreadsheet can be embedded into Blogger Beta blogs. I am going to embed the sample Zoho spreadsheet below and see how it will display:
The original code generated for embeding the sample template was:
I had to change the 'height:400px; width:500px' to 'height:240px;width:300px to fit into the width of the main column.
The embedded spreadsheet is an interactive one. You can modify the data, add new data, etc. You can even save it as an Excel file. Just click on "Save as Excel" at the top of the table. Try it.
For a full description on how to embed a spreadsheet in a post, see How to add PDF files, spreadsheet, etc. to your blog. (Close new window to get back to this page)
The original code generated for embeding the sample template was:
<iframe src='http://www.zohosheet.com/publish.do?doc_id=71787' frameborder='0' style='height:400px;width:300px' scrolling=no></iframe>
I had to change the 'height:400px; width:500px' to 'height:240px;width:300px to fit into the width of the main column.
The embedded spreadsheet is an interactive one. You can modify the data, add new data, etc. You can even save it as an Excel file. Just click on "Save as Excel" at the top of the table. Try it.
For a full description on how to embed a spreadsheet in a post, see How to add PDF files, spreadsheet, etc. to your blog. (Close new window to get back to this page)
Friday, October 13, 2006
What to do when you don't see toolbar or EDIT HTML and COMPOSE tabs in the post editor
I have had this experience of not seeing the toolbar and the EDIT HTML and COMPOSE tabs in the post editor of Blogger Beta. For reasons too long to describe, I have ended up using Opera (even though it is not recommended as Blogger recommend IE and FireFox) when I am signed into my Blogger Beta account, and I have noticed that the problem occur most often in Opera. I have also encountered this problem in other browsers. A reader of my blog Blogger Tips and Tricks contacted me with the same problem and I have adviced her to change browser and/or clear private data (cache, cookies). She reported back that it helped her solve her problem. Another member of the Blogger Help Forum also complained of the same problem and I have given the same advice.
Nitecrurz (Chuck) of The real blogger status (close new window to get back to this page) said that he found a Hard Refresh (Shift - Refresh) usually brings his (toolbar) back.
Nitecrurz (Chuck) of The real blogger status (close new window to get back to this page) said that he found a Hard Refresh (Shift - Refresh) usually brings his (toolbar) back.
Wednesday, October 11, 2006
Test scroll box for text and images in Blogger Beta
When I started this blog, and saw the post editor for the beta blog is be practically the same as Blogger classic (except for the Labels field at the bottom of the post editor), I had assumed everything to work the same. However, when I tested to see if I can manipulate images in the same way, I found I could not resize or reposition images in the COMPOSE mode, something which I can easily do in Blogger classic. See the following post:
Uploading and manipulating photos with Blogger
Testing manipulating images in Blogger Beta
I decided to test if scroll boxes will work for both text and images in Blogger Beta. Below is a scrollable box for text.
Now, I am going to put a scrollable box for images below:
UPDATE: The test is successful. Scroll box works for both text and images in Blogger Beta.
UPDATE: A reader commented about some difficulties in doing the scroll box. I realised that I did not give the codes for the scroll box. I had originally done this for the Blogger classic blog and the relevant post is here: How to make a scroll box. (close new window to get back to this page)
Uploading and manipulating photos with Blogger
Testing manipulating images in Blogger Beta
I decided to test if scroll boxes will work for both text and images in Blogger Beta. Below is a scrollable box for text.
| Bloggers frequently have more than one blogs. If the blogs are all in the same Blogger account, all of them will have the same profile. If you want to have different profiles for different blogs, this is what you must do. It would help if you have more than one browser otherwise, you will have to log in, log out, log in, etc. This will be especially true for those using Blogger Beta. If like many, you have only Internet Explorer, I advise you to install FireFox. It is a much better browser than Internet Explorer. (you may chose to use only one browser if you want, but having 2 browsers will be more convenient). Refer to What is FireFox and why you should be using it. See also the advantages of having more than one browsers on your computer: Why you should be using more than one browser OK, back to the topic. To get your blogs into different account: 1. Start a new Blogger Account with a different email address from your original account. 2. Open a different browser (if you want to use the same browser, you will have to sign out) 3. In the new browser, sign into your original Blogger account (Dashboard). 4. Select the blog you want to be in the new account. 5. Click the SETTINGS > MEMBERS tabs 6. Click "Add Team Member/s" 7. Enter the email address that you used for the new Blogger Account in the New User(s). 8. Go back to the previous browser. Sign into the email address referred to in no. 7 9. Look for the invitation. Accept the invitation. 10. Go back to the browser where you have the original Blogger account and the blog in which you want to be in the new account. In the MEMBERS setting, you should see a new member. Make him an administrator (be very sure of doing this). 11. Go back to the first browser and get into your new Blogger account and confirm that the blog is in your Dashboard. 12. Now that you are sure things have worked out, in your original Blogger account and the relevant blog, in the MEMBERS setting, remove yourself as a member. Now you should have 2 blogs in two different Blogger account and you can set different profiles for the 2 blogs. And if you are using 2 different browsers, you can be logged into both at the same time.
|
Now, I am going to put a scrollable box for images below:
|
|


UPDATE: The test is successful. Scroll box works for both text and images in Blogger Beta.
UPDATE: A reader commented about some difficulties in doing the scroll box. I realised that I did not give the codes for the scroll box. I had originally done this for the Blogger classic blog and the relevant post is here: How to make a scroll box. (close new window to get back to this page)
Tuesday, October 10, 2006
Testing manipulating images in Blogger Beta
UDDATE 28 December 2006: It is now possible to resize the photo in the COMPOSE mode by grabing the corner or the side of the photo in IE7 and FireFox 1.5.0.9 as describe in the post below, and also to drag and drop the photo to another position. It still can't be done with Opera.
UPDATE 1 November 2006: I just tested manipulating the image uploaded via Blogger Beta and have found that I am able to change the size of the image in the COMPOSE mode by clicking on the corners or the sides and dragging, but still cannot drag and drop it to another position. This is with FireFox. With Opera, I can't even click on the corners or the sides. I tried it again on 5 November 2006 and got the same result. In Opera, your can right-click on the image, select "Cut" and drop it in another location though. Reporting problem to Blogger support, don't expect an answer, but hope that they got the message and are working on it.
I have done a post which describe how to manipulate images with Blogger at Uploading and manipulating images in Blogger. I did that test in another post Sepang Formula One Racing Circuit.
I am reporting the result of that test here. Images cannot be resized and reposition in the methods decribed in the post Uploading and manipulating images in Blogger. I tried to resize the photo by trying to grab the corner of the photo to drag in the COMPOSE mode, but failed. I tried to change the width of the photo by trying to grab the side of the photo to drag and failed too. I also tried to reposition the photo by grabbing and dragging the photo, and that failed too.
The only way I can reposition the photo is by going to the EDIT HTML mode, highlighting the HTML for the image (if you don't know how the HTML looks, refer to Uploading and manipulating images in Blogger), right-click and select cut, and post it in the position I want.
If you want to resize the image, you will have to add height="" width="" to your <img> tag. To keep your image undistorted, you will have to choose the number (pixels) you put within "" properly to keep the aspect ratio. Using the free Irfanview photo editor may help you in this task. If you don't know how, add a comment in the comments section and I may redo this post or do a post on using Irfanview. To help you decide on how to add these attributes, I will post a screenshot of the image HTML generated by Blogger with the width and height attribute added. See screenshot below (click to enlarge):

UPDATE: The post on using Irfanview has been done. You can see it here: Using Irfanview photo editor for your Blogger blogs (close new window to come back to this page).
Sunday, October 08, 2006
Testing Spell Check for Blogger Beta
The built-in spell check for Blogger involves pop-up and is very cumbersome to use. There is a post on a more convenient way. See How to do spell check for your Blogger post. With this method, the spell check is done within the post editor window. See screenshot (click to enlarge)

The Blogger Beta built-in spell check has been upgraded and now the spell check doesn't involve pop-up, but is done within the post editor itself. See screenshot below (click to enlarge):
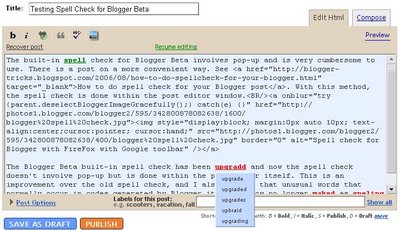
This is an improvement over the old spell check, and I also noticed that unusual words that normally occur in codes generated by Blogger itself is now no longer marked as spelling mistakes, for example words like "onblur" which occurs in HTML for images IF it occurs within the code itself are't marked. However, the "onblur" that I typed here IS marked as a spelling mistake. To do a spell check, you click the icon in the post editor toolbar. After an interval of time, the background color of the text will turn to blue and spelling mistakes are colored red. To edit a spelling mistake, click on the red text and a "pop-up" appear under the text with a list of suggested corrections. Click on your choice and the mistake will be corrected and then colored green. Note, however, the difference in the "pop-up" done with FireFox with Google toolbar, and the Blogger Beta. For the first method, in addition to suggested corrections, there is "Edit", "Ignore all" and "Add to dictionary". To edit, just click "Edit" and type in the correction, then continue with the rest of the mistakes. These options are missing in the Blogger Beta spell check, and to edit a spelling mistake which has no suggested corrections in the list, you have to click "resume editing" at the top of the post editor. This will cause the text to scroll to the beginning of the post editor, and then you will have to search for the mistake (which is now not marked and not easy to find because it is no longer in the position it was when you did the spell check), correct the mistake, then redo the spell check. This is one major disadvantage of the Blogger Beta spell check as compared with the spell check that comes with the FireFox with Google toolbar.
In summary, the method described in this post How to do spellcheck for your Blogger post (can also be used for Blogger Beta) has the advantage when there are no suggested correct spelling, have the choice to ignore all, and the choice to add a marked word into the dictionary. Its disadvantage is that it mark unusual words like "onblur" which occurs in HTML for images, is marked wrongly as a spelling mistake, and can cause problems when you have a lot of codes in the post. The advantage of the built-in spell check for Blogger Beta is that it ignore unusual words that occur in codes generated by Blogger, but when there are words for which no suggested correction occurs, the correction will be more difficult to do.

The Blogger Beta built-in spell check has been upgraded and now the spell check doesn't involve pop-up, but is done within the post editor itself. See screenshot below (click to enlarge):

This is an improvement over the old spell check, and I also noticed that unusual words that normally occur in codes generated by Blogger itself is now no longer marked as spelling mistakes, for example words like "onblur" which occurs in HTML for images IF it occurs within the code itself are't marked. However, the "onblur" that I typed here IS marked as a spelling mistake. To do a spell check, you click the
 icon in the post editor toolbar. After an interval of time, the background color of the text will turn to blue and spelling mistakes are colored red. To edit a spelling mistake, click on the red text and a "pop-up" appear under the text with a list of suggested corrections. Click on your choice and the mistake will be corrected and then colored green. Note, however, the difference in the "pop-up" done with FireFox with Google toolbar, and the Blogger Beta. For the first method, in addition to suggested corrections, there is "Edit", "Ignore all" and "Add to dictionary". To edit, just click "Edit" and type in the correction, then continue with the rest of the mistakes. These options are missing in the Blogger Beta spell check, and to edit a spelling mistake which has no suggested corrections in the list, you have to click "resume editing" at the top of the post editor. This will cause the text to scroll to the beginning of the post editor, and then you will have to search for the mistake (which is now not marked and not easy to find because it is no longer in the position it was when you did the spell check), correct the mistake, then redo the spell check. This is one major disadvantage of the Blogger Beta spell check as compared with the spell check that comes with the FireFox with Google toolbar.
 In summary, the method described in this post How to do spellcheck for your Blogger post (can also be used for Blogger Beta) has the advantage when there are no suggested correct spelling, have the choice to ignore all, and the choice to add a marked word into the dictionary. Its disadvantage is that it mark unusual words like "onblur" which occurs in HTML for images, is marked wrongly as a spelling mistake, and can cause problems when you have a lot of codes in the post. The advantage of the built-in spell check for Blogger Beta is that it ignore unusual words that occur in codes generated by Blogger, but when there are words for which no suggested correction occurs, the correction will be more difficult to do.
Saturday, October 07, 2006
Switching from Bloggger Beta back to Blogger classic
There are quite a number of people who have been invited to Blogger Beta, and have expressed a desparate desire to switch back to Blogger classic (See Wesley's comment in the post Testing non-Blogger Beta blogger commenting on Blogger Beta blogs. There have other complaints, like being uanable to access their pre-Blogger Beta blogs in their account, etc. There are bugs which have been fixed and there is an official blog which is all about existing bugs and which bugs have been fixed, etc. Blogger Buzz have announced a new blog about what bugs the engineers are aware of, what’s being worked on, and when have bugs been fixed. Their announcement of the launch of the blog and a link to the blog is in this post: Known Issues for Blogger in Beta. I hope that gives them some consolation about their problems in knowing that Blogger is working at them.
For those who really want to switch back, I wish the title of this blog could have been "Testing switching from Blogger Beta to Blogger classic", but unfortunately I wasn't one of those who were invited, and this beta blog was made using a gmail account which is not connected to any of my other Blogger classic blogs. So I am afraid I am unable to test anything to see if that is possible or not, but to the best of my knowledge and from frequent readings of the posts in the Google Blogger Help group, it is not possible.
What is possible is to revert a migrated Blogger Beta blog back to the last saved Blogger classic template which however will mean losing many of the useful features of Blogger Beta like labels (categories), and I think layout too. The way to do it is described below.
To change back to a Blogger classic template, log into Dashboard, then for the relevant blog, click LAYOUT, then click EDIT HTML. The post editor will open.
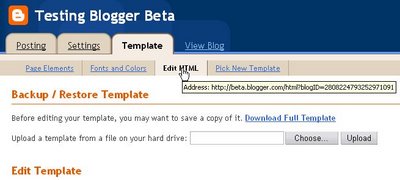
It is highly recommended to save a copy of your current template to your computer DOWNLOAD FULL TEMPLATE at the top of the post editor. Then at the bottom of the post editor, click REVERT TO CLASSIC TEMPLATE.
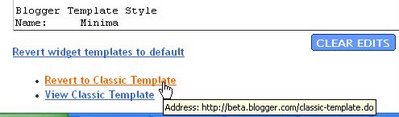
Clicking on REVERT TO CLASSIC TEMPLATE will bring a pop-up with a reassuring message "If you revert to your Classic template, you will still be able to recover your current design." Click OK, and your template will then be reverted to the last saved template of your pre-beta blog. You will then be able to do many of the things that you have been used to doing with your pre-migrated blog. You will, however, lose the new features of Blogger Beta such labels and Layout. (If you are already signed in and in the posting mode (tab) or others, then click the TEMPLATE tab and you will see the EDIT HTML sub-tab. Do as above to get a new Blogger classic template.)
For those who really want to switch back, I wish the title of this blog could have been "Testing switching from Blogger Beta to Blogger classic", but unfortunately I wasn't one of those who were invited, and this beta blog was made using a gmail account which is not connected to any of my other Blogger classic blogs. So I am afraid I am unable to test anything to see if that is possible or not, but to the best of my knowledge and from frequent readings of the posts in the Google Blogger Help group, it is not possible.
What is possible is to revert a migrated Blogger Beta blog back to the last saved Blogger classic template which however will mean losing many of the useful features of Blogger Beta like labels (categories), and I think layout too. The way to do it is described below.
To change back to a Blogger classic template, log into Dashboard, then for the relevant blog, click LAYOUT, then click EDIT HTML. The post editor will open.
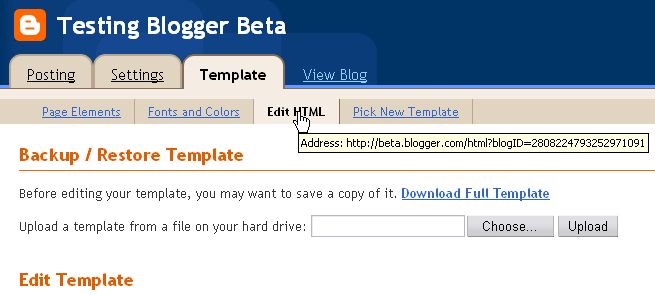
It is highly recommended to save a copy of your current template to your computer DOWNLOAD FULL TEMPLATE at the top of the post editor. Then at the bottom of the post editor, click REVERT TO CLASSIC TEMPLATE.
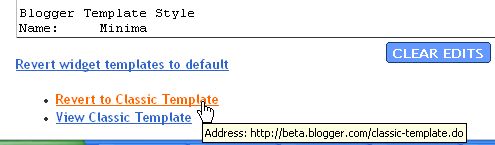
Clicking on REVERT TO CLASSIC TEMPLATE will bring a pop-up with a reassuring message "If you revert to your Classic template, you will still be able to recover your current design." Click OK, and your template will then be reverted to the last saved template of your pre-beta blog. You will then be able to do many of the things that you have been used to doing with your pre-migrated blog. You will, however, lose the new features of Blogger Beta such labels and Layout. (If you are already signed in and in the posting mode (tab) or others, then click the TEMPLATE tab and you will see the EDIT HTML sub-tab. Do as above to get a new Blogger classic template.)
Friday, October 06, 2006
Template of a Blogger Beta template with "Expand widget template" ticked
Someone on the Google Blogger Help have expressed a desire to have a look at the beta template before deciding to shift. So I am going to oblige by posting the template of this blog below. There will be two templates, a simpler one with the "Expand Widget Template" not ticked  . Below that will be a longer template which you will normally use when you need to edit your template for customization, which you get by ticking the "Expand Widget Template"
Blogger Beta template with "Expand Widget Template not ticked
Blogger Beta template with "Expand Widget Template" ticked
 . Below that will be a longer template which you will normally use when you need to edit your template for customization, which you get by ticking the "Expand Widget Template"
Blogger Beta template with "Expand Widget Template not ticked
| <?xml version="1.0" encoding="UTF-8" ?> <!DOCTYPE html PUBLIC "-//W3C//DTD XHTML 1.0 Strict//EN" "http://www.w3.org/TR/xhtml1/DTD/xhtml1-strict.dtd"> <html xmlns='http://www.w3.org/1999/xhtml' xmlns:b='http://www.google.com/2005/gml/b' xmlns:data='http://www.google.com/2005/gml/data' xmlns:expr='http://www.google.com/2005/gml/expr'> <head> <title><data:blog.pageTitle/></title> <b:include data='blog' name='all-head-content'/> <b:skin><![CDATA[/* ------------------------------------------------ Blogger Template Style Name: Minima Designer: Douglas Bowman URL: www.stopdesign.com Date: 26 Feb 2004 Updated by: Blogger Team ------------------------------------------------ */ /* Variable definitions ==================== <Variable name="bgcolor" description="Page Background Color" type="color" default="#fff" value="#ffffff"> <Variable name="textcolor" description="Text Color" type="color" default="#333" value="#333333"> <Variable name="linkcolor" description="Link Color" type="color" default="#58a" value="#5588aa"> <Variable name="pagetitlecolor" description="Blog Title Color" type="color" default="#666" value="#666666"> <Variable name="descriptioncolor" description="Blog Description Color" type="color" default="#999" value="#999999"> <Variable name="titlecolor" description="Post Title Color" type="color" default="#c60" value="#cc6600"> <Variable name="bordercolor" description="Border Color" type="color" default="#ccc" value="#cccccc"> <Variable name="sidebarcolor" description="Sidebar Title Color" type="color" default="#999" value="#999999"> <Variable name="sidebartextcolor" description="Sidebar Text Color" type="color" default="#666" value="#666666"> <Variable name="visitedlinkcolor" description="Visited Link Color" type="color" default="#999" value="#999999"> <Variable name="bodyfont" description="Text Font" type="font" default="normal normal 100% Georgia, Serif" value="normal normal 100% Georgia, Serif"> <Variable name="headerfont" description="Sidebar Title Font" type="font" default="normal normal 78% 'Trebuchet MS',Trebuchet,Arial,Verdana,Sans-serif" value="normal normal 78% 'Trebuchet MS',Trebuchet,Arial,Verdana,Sans-serif"> <Variable name="pagetitlefont" description="Blog Title Font" type="font" default="normal normal 200% Georgia, Serif" value="normal normal 200% Georgia, Serif"> <Variable name="descriptionfont" description="Blog Description Font" type="font" default="normal normal 78% 'Trebuchet MS', Trebuchet, Arial, Verdana, Sans-serif" value="normal normal 78% 'Trebuchet MS', Trebuchet, Arial, Verdana, Sans-serif"> <Variable name="postfooterfont" description="Post Footer Font" type="font" default="normal normal 78% 'Trebuchet MS', Trebuchet, Arial, Verdana, Sans-serif" value="normal normal 78% 'Trebuchet MS', Trebuchet, Arial, Verdana, Sans-serif"> */ /* Use this with templates/template-twocol.html */ body { background:$bgcolor; margin:0; color:$textcolor; font:x-small Georgia Serif; font-size/* */:/**/small; font-size: /**/small; text-align: center; } a:link { color:$linkcolor; text-decoration:none; } a:visited { color:$visitedlinkcolor; text-decoration:none; } a:hover { color:$titlecolor; text-decoration:underline; } a img { border-width:0; } /* Header ------------------------------------------------ */ #header-wrapper { width:660px; margin:0 auto 10px; border:1px solid $bordercolor; } #header { margin: 5px; border: 1px solid $bordercolor; text-align: center; color:$pagetitlecolor; } #header h1 { margin:5px 5px 0; padding:15px 20px .25em; line-height:1.2em; text-transform:uppercase; letter-spacing:.2em; font: $pagetitlefont; } #header a { color:$pagetitlecolor; text-decoration:none; } #header a:hover { color:$pagetitlecolor; } #header .description { margin:0 5px 5px; padding:0 20px 15px; max-width:700px; text-transform:uppercase; letter-spacing:.2em; line-height: 1.4em; font: $descriptionfont; color: $descriptioncolor; } /* Outer-Wrapper ------------------------------------------------ */ #outer-wrapper { width: 750px; margin:0 auto; padding:10px; text-align:left; font: $bodyfont; } #main-wrapper { width: 400px; margin-left: 20px; float: left; word-wrap: break-word; /* fix for long text breaking sidebar float in IE */ } #sidebar-wrapper { width: 150px; float: right; word-wrap: break-word; /* fix for long text breaking sidebar float in IE */ } #newsidebar-wrapper { width: 150px; float: left; word-wrap: break-word; /* fix for long text breaking sidebar float in IE */ } /* Headings ------------------------------------------------ */ h2 { margin:1.5em 0 .75em; font:$headerfont; line-height: 1.4em; text-transform:uppercase; letter-spacing:.2em; color:$sidebarcolor; } /* Posts ------------------------------------------------ */ h2.date-header { margin:1.5em 0 .5em; } .post { margin:.5em 0 1.5em; border-bottom:1px dotted $bordercolor; padding-bottom:1.5em; } .post h3 { margin:.25em 0 0; padding:0 0 4px; font-size:140%; font-weight:normal; line-height:1.4em; color:$titlecolor; } .post h3 a, .post h3 a:visited, .post h3 strong { display:block; text-decoration:none; color:$titlecolor; font-weight:normal; } .post h3 strong, .post h3 a:hover { color:$textcolor; } .post p { margin:0 0 .75em; line-height:1.6em; } .post-footer { margin: .75em 0; color:$sidebarcolor; text-transform:uppercase; letter-spacing:.1em; font: $postfooterfont; line-height: 1.4em; } .comment-link { margin-left:.6em; } .post img { padding:4px; border:1px solid $bordercolor; } .post blockquote { margin:1em 20px; } .post blockquote p { margin:.75em 0; } /* Comments ------------------------------------------------ */ #comments h4 { margin:1em 0; font-weight: bold; line-height: 1.4em; text-transform:uppercase; letter-spacing:.2em; color: $sidebarcolor; } #comments-block { margin:1em 0 1.5em; line-height:1.6em; } #comments-block .comment-author { margin:.5em 0; } #comments-block .comment-body { margin:.25em 0 0; } #comments-block .comment-footer { margin:-.25em 0 2em; line-height: 1.4em; text-transform:uppercase; letter-spacing:.1em; } #comments-block .comment-body p { margin:0 0 .75em; } .deleted-comment { font-style:italic; color:gray; } #blog-pager-newer-link { float: left; } #blog-pager-older-link { float: right; } #blog-pager { text-align: center; } .feed-links { clear: both; line-height: 2.5em; } /* Sidebar Content ------------------------------------------------ */ .sidebar { color: $sidebartextcolor; line-height: 1.5em; } .sidebar ul { list-style:none; margin:0 0 0; padding:0 0 0; } .sidebar li { margin:0; padding:0 0 .25em 15px; text-indent:-15px; line-height:1.5em; } .sidebar .widget, .main .widget { border-bottom:1px dotted $bordercolor; margin:0 0 1.5em; padding:0 0 1.5em; } .main .Blog { border-bottom-width: 0; } /* Profile ------------------------------------------------ */ .profile-img { float: left; margin: 0 5px 5px 0; padding: 4px; border: 1px solid $bordercolor; } .profile-data { margin:0; text-transform:uppercase; letter-spacing:.1em; font: $postfooterfont; color: $sidebarcolor; font-weight: bold; line-height: 1.6em; } .profile-datablock { margin:.5em 0 .5em; } .profile-textblock { margin: 0.5em 0; line-height: 1.6em; } .profile-link { font: $postfooterfont; text-transform: uppercase; letter-spacing: .1em; } /* Footer ------------------------------------------------ */ #footer { width:660px; clear:both; margin:0 auto; padding-top:15px; line-height: 1.6em; text-transform:uppercase; letter-spacing:.1em; text-align: center; } /** Page structure tweaks for layout editor wireframe */ body#layout #header { margin-left: 0px; margin-right: 0px; } ]]></b:skin> </head> <body> <div id='outer-wrapper'><div id='wrap2'> <!-- skip links for text browsers --> <span id='skiplinks' style='display:none;'> <a href='#main'>skip to main </a> | <a href='#sidebar'>skip to sidebar</a> </span> <div id='header-wrapper'> <b:section class='header' id='header' maxwidgets='3' showaddelement='yes'> <b:widget id='Header1' locked='false' title='Testing Blogger Beta (Header)' type='Header'/> <b:widget id='HTML6' locked='false' title='' type='HTML'/> </b:section> </div> <div id='content-wrapper'> <div id='newsidebar-wrapper'> <b:section class='sidebar' id='newsidebar' preferred='yes'> <b:widget id='HTML3' locked='false' title='' type='HTML'/> <b:widget id='HTML9' locked='false' title='' type='HTML'/> <b:widget id='HTML7' locked='false' title='' type='HTML'/> <b:widget id='Profile1' locked='false' title='About Me' type='Profile'/> </b:section> </div> <div id='main-wrapper'> <b:section class='main' id='main' showaddelement='no'> <b:widget id='HTML5' locked='false' title='' type='HTML'/> <b:widget id='Blog1' locked='false' title='Blog Posts' type='Blog'/> </b:section> </div> <div id='sidebar-wrapper'> <b:section class='sidebar' id='sidebar' preferred='yes'> <b:widget id='HTML2' locked='false' title='' type='HTML'/> <b:widget id='HTML1' locked='false' title='' type='HTML'/> <b:widget id='Label1' locked='false' title='Labels' type='Label'/> <b:widget id='BlogArchive1' locked='false' title='Blog Archive' type='BlogArchive'/> <b:widget id='LinkList1' locked='false' title='Blogger Resources' type='LinkList'/> </b:section> </div> <!-- spacer for skins that want sidebar and main to be the same height--> <div class='clear'> </div> </div> <!-- end content-wrapper --> <div id='footer-wrapper'> <b:section class='footer' id='footer'> <b:widget id='HTML8' locked='false' title='' type='HTML'/> <b:widget id='HTML4' locked='false' title='' type='HTML'/> </b:section> </div> </div></div> <!-- end outer-wrapper --> </body> </html> |
Blogger Beta template with "Expand Widget Template" ticked
| <?xml version="1.0" encoding="UTF-8" ?> <!DOCTYPE html PUBLIC "-//W3C//DTD XHTML 1.0 Strict//EN" "http://www.w3.org/TR/xhtml1/DTD/xhtml1-strict.dtd"> <html xmlns='http://www.w3.org/1999/xhtml' xmlns:b='http://www.google.com/2005/gml/b' xmlns:data='http://www.google.com/2005/gml/data' xmlns:expr='http://www.google.com/2005/gml/expr'> <head> <title><data:blog.pageTitle/></title> <b:include data='blog' name='all-head-content'/> <b:skin><![CDATA[/* ------------------------------------------------ Blogger Template Style Name: Minima Designer: Douglas Bowman URL: www.stopdesign.com Date: 26 Feb 2004 Updated by: Blogger Team ------------------------------------------------ */ /* Variable definitions ==================== <Variable name="bgcolor" description="Page Background Color" type="color" default="#fff" value="#ffffff"> <Variable name="textcolor" description="Text Color" type="color" default="#333" value="#333333"> <Variable name="linkcolor" description="Link Color" type="color" default="#58a" value="#5588aa"> <Variable name="pagetitlecolor" description="Blog Title Color" type="color" default="#666" value="#666666"> <Variable name="descriptioncolor" description="Blog Description Color" type="color" default="#999" value="#999999"> <Variable name="titlecolor" description="Post Title Color" type="color" default="#c60" value="#cc6600"> <Variable name="bordercolor" description="Border Color" type="color" default="#ccc" value="#cccccc"> <Variable name="sidebarcolor" description="Sidebar Title Color" type="color" default="#999" value="#999999"> <Variable name="sidebartextcolor" description="Sidebar Text Color" type="color" default="#666" value="#666666"> <Variable name="visitedlinkcolor" description="Visited Link Color" type="color" default="#999" value="#999999"> <Variable name="bodyfont" description="Text Font" type="font" default="normal normal 100% Georgia, Serif" value="normal normal 100% Georgia, Serif"> <Variable name="headerfont" description="Sidebar Title Font" type="font" default="normal normal 78% 'Trebuchet MS',Trebuchet,Arial,Verdana,Sans-serif" value="normal normal 78% 'Trebuchet MS',Trebuchet,Arial,Verdana,Sans-serif"> <Variable name="pagetitlefont" description="Blog Title Font" type="font" default="normal normal 200% Georgia, Serif" value="normal normal 200% Georgia, Serif"> <Variable name="descriptionfont" description="Blog Description Font" type="font" default="normal normal 78% 'Trebuchet MS', Trebuchet, Arial, Verdana, Sans-serif" value="normal normal 78% 'Trebuchet MS', Trebuchet, Arial, Verdana, Sans-serif"> <Variable name="postfooterfont" description="Post Footer Font" type="font" default="normal normal 78% 'Trebuchet MS', Trebuchet, Arial, Verdana, Sans-serif" value="normal normal 78% 'Trebuchet MS', Trebuchet, Arial, Verdana, Sans-serif"> */ /* Use this with templates/template-twocol.html */ body { background:$bgcolor; margin:0; color:$textcolor; font:x-small Georgia Serif; font-size/* */:/**/small; font-size: /**/small; text-align: center; } a:link { color:$linkcolor; text-decoration:none; } a:visited { color:$visitedlinkcolor; text-decoration:none; } a:hover { color:$titlecolor; text-decoration:underline; } a img { border-width:0; } /* Header ------------------------------------------------ */ #header-wrapper { width:660px; margin:0 auto 10px; border:1px solid $bordercolor; } #header { margin: 5px; border: 1px solid $bordercolor; text-align: center; color:$pagetitlecolor; } #header h1 { margin:5px 5px 0; padding:15px 20px .25em; line-height:1.2em; text-transform:uppercase; letter-spacing:.2em; font: $pagetitlefont; } #header a { color:$pagetitlecolor; text-decoration:none; } #header a:hover { color:$pagetitlecolor; } #header .description { margin:0 5px 5px; padding:0 20px 15px; max-width:700px; text-transform:uppercase; letter-spacing:.2em; line-height: 1.4em; font: $descriptionfont; color: $descriptioncolor; } /* Outer-Wrapper ------------------------------------------------ */ #outer-wrapper { width: 750px; margin:0 auto; padding:10px; text-align:left; font: $bodyfont; } #main-wrapper { width: 400px; margin-left: 20px; float: left; word-wrap: break-word; /* fix for long text breaking sidebar float in IE */ } #sidebar-wrapper { width: 150px; float: right; word-wrap: break-word; /* fix for long text breaking sidebar float in IE */ } #newsidebar-wrapper { width: 150px; float: left; word-wrap: break-word; /* fix for long text breaking sidebar float in IE */ } /* Headings ------------------------------------------------ */ h2 { margin:1.5em 0 .75em; font:$headerfont; line-height: 1.4em; text-transform:uppercase; letter-spacing:.2em; color:$sidebarcolor; } /* Posts ------------------------------------------------ */ h2.date-header { margin:1.5em 0 .5em; } .post { margin:.5em 0 1.5em; border-bottom:1px dotted $bordercolor; padding-bottom:1.5em; } .post h3 { margin:.25em 0 0; padding:0 0 4px; font-size:140%; font-weight:normal; line-height:1.4em; color:$titlecolor; } .post h3 a, .post h3 a:visited, .post h3 strong { display:block; text-decoration:none; color:$titlecolor; font-weight:normal; } .post h3 strong, .post h3 a:hover { color:$textcolor; } .post p { margin:0 0 .75em; line-height:1.6em; } .post-footer { margin: .75em 0; color:$sidebarcolor; text-transform:uppercase; letter-spacing:.1em; font: $postfooterfont; line-height: 1.4em; } .comment-link { margin-left:.6em; } .post img { padding:4px; border:1px solid $bordercolor; } .post blockquote { margin:1em 20px; } .post blockquote p { margin:.75em 0; } /* Comments ------------------------------------------------ */ #comments h4 { margin:1em 0; font-weight: bold; line-height: 1.4em; text-transform:uppercase; letter-spacing:.2em; color: $sidebarcolor; } #comments-block { margin:1em 0 1.5em; line-height:1.6em; } #comments-block .comment-author { margin:.5em 0; } #comments-block .comment-body { margin:.25em 0 0; } #comments-block .comment-footer { margin:-.25em 0 2em; line-height: 1.4em; text-transform:uppercase; letter-spacing:.1em; } #comments-block .comment-body p { margin:0 0 .75em; } .deleted-comment { font-style:italic; color:gray; } #blog-pager-newer-link { float: left; } #blog-pager-older-link { float: right; } #blog-pager { text-align: center; } .feed-links { clear: both; line-height: 2.5em; } /* Sidebar Content ------------------------------------------------ */ .sidebar { color: $sidebartextcolor; line-height: 1.5em; } .sidebar ul { list-style:none; margin:0 0 0; padding:0 0 0; } .sidebar li { margin:0; padding:0 0 .25em 15px; text-indent:-15px; line-height:1.5em; } .sidebar .widget, .main .widget { border-bottom:1px dotted $bordercolor; margin:0 0 1.5em; padding:0 0 1.5em; } .main .Blog { border-bottom-width: 0; } /* Profile ------------------------------------------------ */ .profile-img { float: left; margin: 0 5px 5px 0; padding: 4px; border: 1px solid $bordercolor; } .profile-data { margin:0; text-transform:uppercase; letter-spacing:.1em; font: $postfooterfont; color: $sidebarcolor; font-weight: bold; line-height: 1.6em; } .profile-datablock { margin:.5em 0 .5em; } .profile-textblock { margin: 0.5em 0; line-height: 1.6em; } .profile-link { font: $postfooterfont; text-transform: uppercase; letter-spacing: .1em; } /* Footer ------------------------------------------------ */ #footer { width:660px; clear:both; margin:0 auto; padding-top:15px; line-height: 1.6em; text-transform:uppercase; letter-spacing:.1em; text-align: center; } /** Page structure tweaks for layout editor wireframe */ body#layout #header { margin-left: 0px; margin-right: 0px; } ]]></b:skin> </head> <body> <div id='outer-wrapper'><div id='wrap2'> <!-- skip links for text browsers --> <span id='skiplinks' style='display:none;'> <a href='#main'>skip to main </a> | <a href='#sidebar'>skip to sidebar</a> </span> <div id='header-wrapper'> <b:section class='header' id='header' maxwidgets='3' showaddelement='yes'> <b:widget id='Header1' locked='false' title='Testing Blogger Beta (Header)' type='Header'> <b:includable id='main'> <div class='titlewrapper'> <h1 class='title'> <b:if cond='data:blog.url == data:blog.homepageUrl'> <data:title/> <b:else/> <a expr:href='data:blog.homepageUrl'><data:title/></a> </b:if> </h1> </div> <div class='descriptionwrapper'> <p class='description'><span><data:description/></span></p> </div> </b:includable> </b:widget> <b:widget id='HTML6' locked='false' title='' type='HTML'> <b:includable id='main'> <!-- only display title if it's non-empty --> <b:if cond='data:title != ""'> <h2 class='title'><data:title/></h2> </b:if> <div class='widget-content'> <data:content/> </div> <b:include name='quickedit'/> </b:includable> </b:widget> </b:section> </div> <div id='content-wrapper'> <div id='newsidebar-wrapper'> <b:section class='sidebar' id='newsidebar' preferred='yes'> <b:widget id='HTML3' locked='false' title='' type='HTML'> <b:includable id='main'> <!-- only display title if it's non-empty --> <b:if cond='data:title != ""'> <h2 class='title'><data:title/></h2> </b:if> <div class='widget-content'> <data:content/> </div> <b:include name='quickedit'/> </b:includable> </b:widget> <b:widget id='HTML9' locked='false' title='' type='HTML'> <b:includable id='main'> <!-- only display title if it's non-empty --> <b:if cond='data:title != ""'> <h2 class='title'><data:title/></h2> </b:if> <div class='widget-content'> <data:content/> </div> <b:include name='quickedit'/> </b:includable> </b:widget> <b:widget id='HTML7' locked='false' title='' type='HTML'> <b:includable id='main'> <!-- only display title if it's non-empty --> <b:if cond='data:title != ""'> <h2 class='title'><data:title/></h2> </b:if> <div class='widget-content'> <data:content/> </div> <b:include name='quickedit'/> </b:includable> </b:widget> <b:widget id='Profile1' locked='false' title='About Me' type='Profile'> <b:includable id='main'> <b:if cond='data:title != ""'> <h2><data:title/></h2> </b:if> <div class='widget-content'> <b:if cond='data:team == "true"'> <!-- team blog profile --> <ul> <b:loop values='data:authors' var='i'> <li><a expr:href='data:i.userUrl'><data:i.display-name/></a></li> </b:loop> </ul> <b:else/> <!-- normal blog profile --> <b:if cond='data:photo.url != ""'> <a expr:href='data:userUrl'><img class='profile-img' expr:alt='data:photo.alt' expr:height='data:photo.height' expr:src='data:photo.url' expr:width='data:photo.width'/></a> </b:if> <dl class='profile-datablock'> <dt class='profile-data'><data:displayname/></dt> <b:if cond='data:showlocation == "true"'> <dd class='profile-data'><data:location/></dd> </b:if> <b:if cond='data:aboutme != ""'><dd class='profile-textblock'><data:aboutme/></dd></b:if> </dl> <a class='profile-link' expr:href='data:userUrl'>View my complete profile</a> </b:if> <b:include name='quickedit'/> </div> </b:includable> </b:widget> </b:section> </div> <div id='main-wrapper'> <b:section class='main' id='main' showaddelement='no'> <b:widget id='HTML5' locked='false' title='' type='HTML'> <b:includable id='main'> <!-- only display title if it's non-empty --> <b:if cond='data:title != ""'> <h2 class='title'><data:title/></h2> </b:if> <div class='widget-content'> <data:content/> </div> <b:include name='quickedit'/> </b:includable> </b:widget> <b:widget id='Blog1' locked='false' title='Blog Posts' type='Blog'> <b:includable id='main' var='top'> <!-- posts --> <div class='blog-posts'> <b:loop values='data:posts' var='post'> <b:if cond='data:post.dateHeader'> <h2 class='date-header'><data:post.dateHeader/></h2> </b:if> <b:include data='post' name='post'/> <b:if cond='data:blog.pageType == "item"'> <b:if cond='data:post.allowComments'> <b:include data='post' name='comments'/> </b:if> </b:if> </b:loop> </div> <!-- navigation --> <b:include name='nextprev'/> <!-- feed links --> <b:include name='feedLinks'/> </b:includable> <b:includable id='nextprev'> <div class='blog-pager' id='blog-pager'> <b:if cond='data:newerPageUrl'> <span id='blog-pager-newer-link'> <a class='blog-pager-newer-link' expr:href='data:newerPageUrl' expr:id='data:widget.instanceId + "_blog-pager-newer-link"' expr:title='data:newerPageTitle'><data:newerPageTitle/></a> </span> </b:if> <b:if cond='data:olderPageUrl'> <span id='blog-pager-older-link'> <a class='blog-pager-older-link' expr:href='data:olderPageUrl' expr:id='data:widget.instanceId + "_blog-pager-older-link"' expr:title='data:olderPageTitle'><data:olderPageTitle/></a> </span> </b:if> <b:if cond='data:blog.homepageUrl != data:blog.url'> <a class='home-link' expr:href='data:blog.homepageUrl'>Home</a> </b:if> </div> <div class='clear'/> </b:includable> <b:includable id='post' var='post'> <div class='post uncustomized-post-template'> <a expr:name='data:post.id'/> <b:if cond='data:post.title'> <h3 class='post-title'> <b:if cond='data:post.link'> <a expr:href='data:post.link'><data:post.title/></a> <b:else/> <b:if cond='data:post.url'> <a expr:href='data:post.url'><data:post.title/></a> <b:else/> <data:post.title/> </b:if> </b:if> </h3> </b:if> <div class='post-header-line-1'/> <div class='post-body'> <p><data:post.body/></p> <div style='clear: both;'/> <!-- clear for photos floats --> </div> <div class='post-footer'> <p class='post-footer-line post-footer-line-1'> <span class='post-author'> <b:if cond='data:top.showAuthor'> <data:top.authorLabel/> <data:post.author/> </b:if> </span> <span class='post-timestamp'> <b:if cond='data:top.showTimestamp'> <data:top.timestampLabel/> <b:if cond='data:post.url'> <a class='timestamp-link' expr:href='data:post.url' title='permanent link'><data:post.timestamp/></a> </b:if> </b:if> </span> <span class='post-comment-link'> <b:if cond='data:blog.pageType != "item"'> <b:if cond='data:post.allowComments'> <a class='comment-link' expr:href='data:post.addCommentUrl' expr:onclick='data:post.addCommentOnclick'><b:if cond='data:post.numComments == 1'>1 <data:top.commentLabel/><b:else/><data:post.numComments/> <data:top.commentLabelPlural/></b:if></a> </b:if> </b:if> </span> <!-- backlinks --> <span class='post-backlinks post-comment-link'> <b:if cond='data:blog.pageType != "item"'> <b:if cond='data:post.showBacklinks'> <a class='comment-link' expr:href='data:post.url + "#links"'><data:top.backlinkLabel/></a> </b:if> </b:if> </span> <span class='post-icons'> <!-- email post links --> <b:if cond='data:post.emailPostUrl'> <span class='item-action'> <a expr:href='data:post.emailPostUrl' title='Email Post'> <span class='email-post-icon'> </span> </a> </span> </b:if> <!-- quickedit pencil --> <b:include data='post' name='postQuickEdit'/> </span> </p> <p class='post-footer-line post-footer-line-2'> <span class='post-labels'> <b:if cond='data:post.labels'> <data:postLabelsLabel/> <b:loop values='data:post.labels' var='label'> <a expr:href='data:label.url' rel='tag'><data:label.name/></a><b:if cond='data:label.isLast != "true"'>,</b:if> </b:loop> </b:if> </span> </p> <p class='post-footer-line post-footer-line-3'/> </div> </div> </b:includable> <b:includable id='postQuickEdit' var='post'> <b:if cond='data:post.editUrl'> <span expr:class='"item-control " + data:post.adminClass'> <a expr:href='data:post.editUrl' title='Edit Post'> <span class='quick-edit-icon'> </span> </a> </span> </b:if> </b:includable> <b:includable id='commentDeleteIcon' var='comment'> <span expr:class='"item-control " + data:comment.adminClass'> <a expr:href='data:comment.deleteUrl' title='Delete Comment'> <span class='delete-comment-icon'> </span> </a> </span> </b:includable> <b:includable id='backlinkDeleteIcon' var='backlink'> <span expr:class='"item-control " + data:backlink.adminClass'> <a expr:href='data:backlink.deleteUrl' title='Delete Backlink'> <span class='delete-comment-icon'> </span> </a> </span> </b:includable> <b:includable id='comments' var='post'> <div class='comments' id='comments'> <a name='comments'/> <h4> <b:if cond='data:post.numComments == 1'> 1 Comment: <b:else/> <data:post.numComments/> Comments: </b:if> </h4> <dl id='comments-block'> <b:loop values='data:post.comments' var='comment'> <dt class='comment-author' expr:id='"comment-" + data:comment.id'> <a expr:name='"comment-" + data:comment.id'/> <b:if cond='data:comment.authorUrl'> <a expr:href='data:comment.authorUrl' rel='nofollow'><data:comment.author/></a> <b:else/> <data:comment.author/> </b:if> said... </dt> <dd class='comment-body'> <b:if cond='data:comment.isDeleted'> <span class='deleted-comment'><data:comment.body/></span> <b:else/> <p><data:comment.body/></p> </b:if> </dd> <dd class='comment-footer'> <span class='comment-timestamp'> <a expr:href='"#comment-" + data:comment.id' title='comment permalink'> <data:comment.timestamp/> </a> <b:include data='comment' name='commentDeleteIcon'/> </span> </dd> </b:loop> </dl> <p class='comment-footer'> <a expr:href='data:post.addCommentUrl' expr:onclick='data:post.addCommentOnclick'>Post a Comment</a> </p> <div id='backlinks-container'> <div expr:id='data:widget.instanceId + "_backlinks-container"'> <b:if cond='data:post.showBacklinks'> <b:include data='post' name='backlinks'/> </b:if> </div> </div> </div> </b:includable> <b:includable id='backlinks' var='post'> <a name='links'/><h4><data:post.backlinksLabel/></h4> <b:if cond='data:post.numBacklinks != 0'> <dl class='comments-block' id='comments-block'> <b:loop values='data:post.backlinks' var='backlink'> <div class='collapsed-backlink backlink-control'> <dt class='comment-title'> <span class='backlink-toggle-zippy'> </span> <a expr:href='data:backlink.url' rel='nofollow'><data:backlink.title/></a> <b:include data='backlink' name='backlinkDeleteIcon'/> </dt> <dd class='comment-body collapseable'> <data:backlink.snippet/> </dd> <dd class='comment-footer collapseable'> <span class='comment-author'><data:post.authorLabel/> <data:backlink.author/></span> <span class='comment-timestamp'><data:post.timestampLabel/> <data:backlink.timestamp/></span> </dd> </div> </b:loop> </dl> </b:if> <p class='comment-footer'> <a class='comment-link' expr:href='data:post.createLinkUrl' target='_blank'><data:post.createLinkLabel/></a> </p> </b:includable> <b:includable id='feedLinks'> <b:if cond='data:blog.pageType != "item"'> <!-- Blog feed links --> <b:if cond='data:feedLinks'> <div class='blog-feeds'> <b:include data='feedLinks' name='feedLinksBody'/> </div> </b:if> <b:else/> <!--Post feed links --> <div class='post-feeds'> <b:loop values='data:posts' var='post'> <b:if cond='data:post.allowComments'> <b:if cond='data:post.feedLinks'> <b:include data='post.feedLinks' name='feedLinksBody'/> </b:if> </b:if> </b:loop> </div> </b:if> </b:includable> <b:includable id='feedLinksBody' var='links'> <div class='feed-links'> Subscribe to: <b:loop values='data:links' var='f'> <a class='feed-link' expr:href='data:f.url' expr:type='data:f.mimeType' target='_blank'><data:f.name/> (<data:f.feedType/>)</a> </b:loop> </div> </b:includable> </b:widget> </b:section> </div> <div id='sidebar-wrapper'> <b:section class='sidebar' id='sidebar' preferred='yes'> <b:widget id='HTML2' locked='false' title='' type='HTML'> <b:includable id='main'> <!-- only display title if it's non-empty --> <b:if cond='data:title != ""'> <h2 class='title'><data:title/></h2> </b:if> <div class='widget-content'> <data:content/> </div> <b:include name='quickedit'/> </b:includable> </b:widget> <b:widget id='HTML1' locked='false' title='' type='HTML'> <b:includable id='main'> <!-- only display title if it's non-empty --> <b:if cond='data:title != ""'> <h2 class='title'><data:title/></h2> </b:if> <div class='widget-content'> <data:content/> </div> <b:include name='quickedit'/> </b:includable> </b:widget> <b:widget id='Label1' locked='false' title='Labels' type='Label'> <b:includable id='main'> <b:if cond='data:title'> <h2><data:title/></h2> </b:if> <div class='widget-content'> <ul> <b:loop values='data:labels' var='label'> <li> <b:if cond='data:blog.url == data:label.url'> <data:label.name/> <b:else/> <a expr:href='data:label.url'><data:label.name/></a> </b:if> (<data:label.count/>) </li> </b:loop> </ul> <b:include name='quickedit'/> </div> </b:includable> </b:widget> <b:widget id='BlogArchive1' locked='false' title='Blog Archive' type='BlogArchive'> <b:includable id='main'> <b:if cond='data:title'> <h2><data:title/></h2> </b:if> <div class='widget-content'> <div id='ArchiveList'> <div expr:id='data:widget.instanceId + "_ArchiveList"'> <b:if cond='data:style == "HIERARCHY"'> <b:include data='data' name='interval'/> </b:if> <b:if cond='data:style == "FLAT"'> <b:include data='data' name='flat'/> </b:if> <b:if cond='data:style == "MENU"'> <b:include data='data' name='menu'/> </b:if> </div> </div> <b:include name='quickedit'/> </div> </b:includable> <b:includable id='flat' var='data'> <ul> <b:loop values='data:data' var='i'> <li class='archivedate'> <a expr:href='data:i.url'><data:i.name/></a> (<data:i.post-count/>) </li> </b:loop> </ul> </b:includable> <b:includable id='menu' var='data'> <select expr:id='data:widget.instanceId + "_ArchiveMenu"'> <option value=''><data:title/></option> <b:loop values='data:data' var='i'> <option expr:value='data:i.url'><data:i.name/> (<data:i.post-count/>)</option> </b:loop> </select> </b:includable> <b:includable id='interval' var='intervalData'> <b:loop values='data:intervalData' var='i'> <ul> <li expr:class='"archivedate " + data:i.expclass'> <b:include data='i' name='toggle'/> <a class='post-count-link' expr:href='data:i.url'><data:i.name/></a> (<span class='post-count'><data:i.post-count/></span>) <b:if cond='data:i.data'> <b:include data='i.data' name='interval'/> </b:if> <b:if cond='data:i.posts'> <b:include data='i.posts' name='posts'/> </b:if> </li> </ul> </b:loop> </b:includable> <b:includable id='toggle' var='interval'> <b:if cond='data:interval.toggleId'> <b:if cond='data:interval.expclass == "expanded"'> <a class='toggle' expr:href='data:widget.actionUrl + "&action=toggle" + "&dir=close&toggle=" + data:interval.toggleId + "&toggleopen=" + data:toggleopen'> <span class='zippy toggle-open'>▼ </span> </a> <b:else/> <a class='toggle' expr:href='data:widget.actionUrl + "&action=toggle" + "&dir=open&toggle=" + data:interval.toggleId + "&toggleopen=" + data:toggleopen'> <span class='zippy'>► </span> </a> </b:if> </b:if> </b:includable> <b:includable id='posts' var='posts'> <ul class='posts'> <b:loop values='data:posts' var='i'> <li><a expr:href='data:i.url'><data:i.title/></a></li> </b:loop> </ul> </b:includable> </b:widget> <b:widget id='LinkList1' locked='false' title='Blogger Resources' type='LinkList'> <b:includable id='main'> <b:if cond='data:title'><h2><data:title/></h2></b:if> <div class='widget-content'> <ul> <div id='link'> <b:loop values='data:links' var='link'> <li><a expr:href='data:link.target' target='_blank'><data:link.name/></a></li> </b:loop> </div> </ul> <b:include name='quickedit'/> </div> </b:includable> </b:widget> </b:section> </div> <!-- spacer for skins that want sidebar and main to be the same height--> <div class='clear'> </div> </div> <!-- end content-wrapper --> <div id='footer-wrapper'> <b:section class='footer' id='footer'> <b:widget id='HTML8' locked='false' title='' type='HTML'> <b:includable id='main'> <!-- only display title if it's non-empty --> <b:if cond='data:title != ""'> <h2 class='title'><data:title/></h2> </b:if> <div class='widget-content'> <data:content/> </div> <b:include name='quickedit'/> </b:includable> </b:widget> <b:widget id='HTML4' locked='false' title='' type='HTML'> <b:includable id='main'> <!-- only display title if it's non-empty --> <b:if cond='data:title != ""'> <h2 class='title'><data:title/></h2> </b:if> <div class='widget-content'> <data:content/> </div> <b:include name='quickedit'/> </b:includable> </b:widget> </b:section> </div> </div></div> <!-- end outer-wrapper --> </body> </html> |
Subscribe to:
Posts (Atom)